Feature
- It is a system to recognize the information on the appearance of the alveolar bone where the implant is to be placed through the pin and to make the implant placement surgery more accurate and convenient through the system.
- When a digital guide is used, the obstruction of the operating visibility is burdensome, but it is easier to secure more accurate view.
- There is no additional cost for digital guide production and the procedure can be performed immediately after consultation with the patient.
- Kit specialized in easy, simple and non-invasive procedure during the implant surgery.
Direction for use
COMPONENT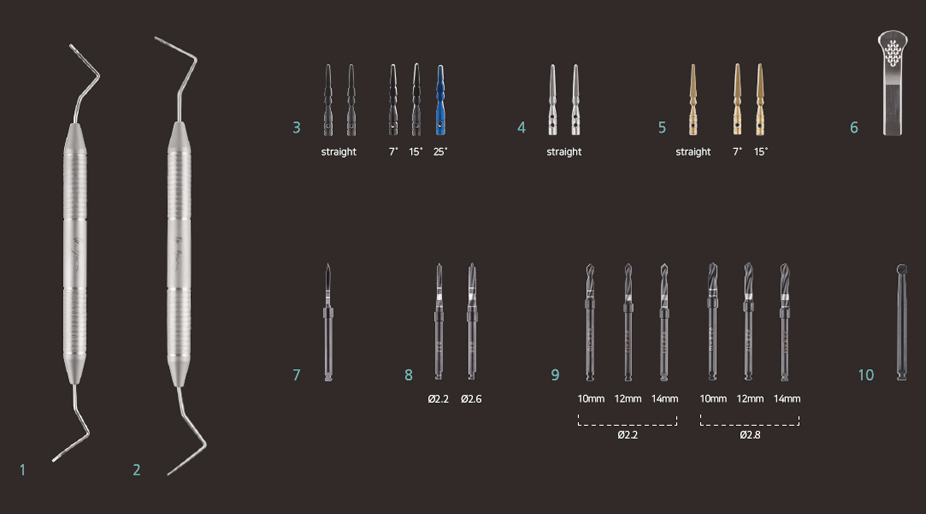
- Blade Marker : It marks the position of pin insertion in the buccal and lingual sides of the alveolar bone.
- Point Marker : The access of the pin is secured using the point marker at the marked area after the blade marker is used.
- Straight pin : The PIN-PIN inserted into the mucous membrane of the buccal side of the alveolar bone where the implant is to be placed is located between the bone and the periosteum. [straight, 7 degrees, 15 degrees, 25 degrees]
- Narrow pin : The pin inserted into the mucous membrane of the lingual or palatal side of the alveolar bone where the implant is to be placed.
- Wide pin : It is used when the inserted straight pin has mobility in the mucous membrane. [straight , 7 degrees, 15 degrees]
- Holder : The device to put and handle the pin.
- Point drill : The initial drill for drilling. It is positioned at the center between two pins.
- Lindeman drill : It is used to change the position of the drilling hole. [Ø2.2, Ø2.6]
- Cutting drill : It is used to form the hole. [Ø2.2 ( 10mm , 12mm, 14mm ), Ø2.8 ( 10mm, 12mm, 14mm )]
- Round drill : It implements grinding the upper part of the bone hole after the implant is placed.
It helps to prevent abutment from getting caught in the bone when the healing abutment is put on.

